How to Set Indoor Lighting for a Video Shoot
When shooting indoors, lighting is one of the most important factors in achieving a high-quality and cinematic image for the final output. Indoor lighting that is carefully adjusted can do much for the ambience, draw attention to important details, and remove harsh shadows and glares. Understanding how to set up indoor lighting matters whether you’re recording a vlog, interview, short film, or any other video production. This step-by-step guide will show you what you need to know when setting up proper lighting for indoor video production. Below are 8 steps:
Step 1: Evaluate the Location

- Before setting up any lights:
- Check out the interior of the place where you’ll be shooting.
- Observe the level of light coming in through the windows and the level of light coming in from any lamps or ceiling lights.
- Find trouble spots like dark shadows and poor lighting. You may use this evaluation’s results to determine what kind and how much light will be required for the outcome you want.
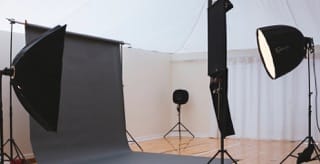
Step 2: Assemble all required lighting equipment
- You may want to try various lighting setups to get even lighting when shooting indoors. Important equipment includes:
- Key light: The primary source of brightness and should be the brightest of all the lights in the scene.
- Fill light: Used to round out the lighting and diffuse any harsh shadows created by the key light.
- Backlight: It can use to brighten the subject from behind to create a feeling of depth in a photograph,
- Reflector: With the help of reflectors, you may soften the appearance of shadows and achieve a more even, pleasing light.
- LED panels or softboxes: Offer consistent soft light that can adjust for different shooting environments.
Step 3: Set Up the Key Light

The key light should angle at a 45-degree angle and place out to one side, almost above the subject’s eye level. The area will give the video a more realistic, three-dimensional look and feel. You may change the scene’s setting by adjusting the key light’s brightness: a brighter light creates a more energetic set, while a dimmer to creates a more intimate and sensual one.
Step 4: Add the Fill Light
The fill light should angle downwards and to the opposite side of the primary light. It softens the key light’s shadows and spreads light evenly across the subject’s face. For depth, the fill light’s intensity should be less than the key light’s.
Step 5: Set Up the Backlight
Use the backlight to light up the subject from behind, either on their back or shoulder. This light helps to highlight the photograph’s background while also highlighting its depth. It works great for creating a dramatic image or using dim lighting.
Step 6: Use Reflectors
A reflector is an affordable and flexible item that may enhance your interior lighting. It create more even lighting by reflecting light onto the subject. Play around with silver, gold, and white reflectors to see what happens!
Step 7: Control the White Balance
For indoor videography, keeping the white balance consistent is important. Most modern cameras have many lighting modes, including those optimised for tungsten and fluorescent lighting. To get the most true-to-life colours, you may also manually tweak the white balance.
Step 8: Test and Adjust
After you’ve set up the lights, it’s time to take some test shots to check the results. Move lights around and turn them up or down to get the desired outcome. Feel free to play around with different camera positions and exposure settings until you get the desired effect.
Last, preparing in advance, paying close attention to detail, and being creative while setting up interior lighting for video production are important. Making visually appealing and attractive videos requires understanding key, fill, and backlighting, as well as using reflectors effectively. Remember to pick a good spot, get the correct lighting equipment, and keep tweaking things until you get the desired results. Your video will reach a new level of quality as you gain expertise and master your indoor lighting skills. Slide into our DMs via our Instagram @tinkersociety or drop us an email at wink@tinkersociety.com to find out how you can get started.
Contact us at tinkersociety